Picture Lab Activity 3
<< Picture Lab Activity 2 | Picture Lab | Picture Lab Activity 4 >>
Exploring a Picture
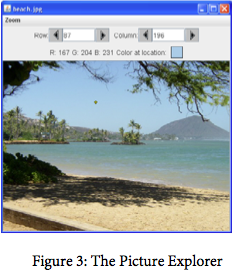
Run the main method in PictureExplorer.java. This will load a picture of a beach from a file, make a copy of that picture in memory, and show it in the explorer tool (Figure 3). It makes a copy of the picture to make it easier to explore a picture both before and after any changes. You can use the explorer tool to explore the pixels in a picture. Click any location (pixel) in the picture and it will display the row index, column index, and red, green, and blue values for that location. The location will be highlighted with yellow crosshairs. You can click on the arrow keys or even type in values and hit the enter button to update the display. You can also use the menu to change the zoom level.
Questions
- What is the row index for the top left corner of the picture?
- What is the column index for the top left corner of the picture?
- The width of this picture is 640. What is the right most column index?
- The height of this picture is 480. What is the bottom most row index?
- Does the row index increase from left to right or top to bottom?
- Does the column index increase from left to right or top to bottom?
- Set the zoom to 500%. Can you see squares of color? This is called pixelation. Pixelation means displaying a picture so magnified that the individual pixels look like small squares.
Creating and exploring other pictures
Here is the main method in the class PictureExplorer. Every class in Java can have a main method, and it is where execution starts when you execute the command java ClassName.
     public static void main( String args[])
     {
       Picture pix = new Picture("beach.jpg");
       pix.explore();
     }
The body of the main method declares a reference to a Picture object named pix and sets that variable to refer to a Picture object created from the data stored in a JPEG file named
“beach.jpg” in the images folder. A JPEG file is one that follows an international standard for storing picture data using lossy compression. Lossy compression means that the amount of data that is stored is much smaller than the available data, but the part that is not stored is data we won't miss.
Exercises
- Modify the
mainmethod in thePictureExplorerclass to create and explore a different picture from theimagesfolder. - Add a picture to the images folder and then create and explore that picture in the main method. If the picture is very large (for instance, one from a digital camera), you can scale it using the
scalemethod in thePictureclass. For example, you can make a new picture (“smallMyPicture.jpg”
folder) one-fourth the size of the original (“myPicture.jpg”) using:
Picture p = new Picture("myPicture.jpg");
Picture smallP = p.scale(0.25,0.25);
smallP.write("smallMyPicture.jpg");
Try this one (place it in the 'images' folder). The Filename is "SF.png":