
Picture Lab Activity 5
<< Picture Lab Activity 4 | Picture Lab | Picture Lab Activity 6 >>
Modifying a Picture
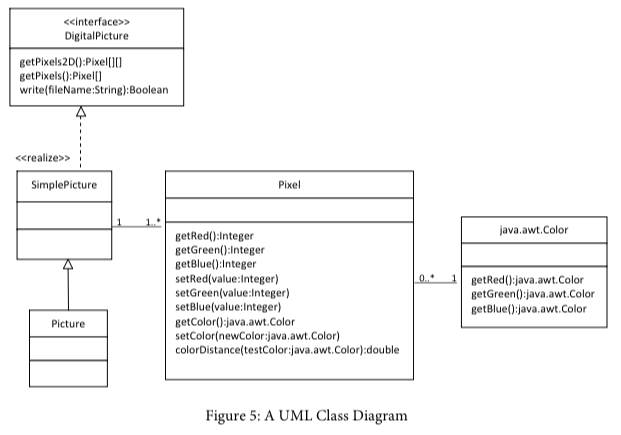
Even though digital pictures have millions of pixels, modern computers are so fast that they can process all of them quickly. You will write methods in the Picture class that modify digital pictures. The Picture class inherits from the SimplePicture class and the SimplePicture class implements the DigitalPicture interface as shown in the Unified Modeling Language (UML) class diagram below (Figure 5).
Questions
- Open
Picture.javaand look for the methodgetPixels2D. Is it there? - Open
SimplePicture.javaand look for the methodgetPixels2D. Is it there? - Does the following code compile?
DigitalPicture p = new DigitalPicture(); - Assuming that a no-argument constructor exists for
SimplePicture, would the following code compile?DigitalPicture p = new SimplePicture(); - Assuming that a no-argument constructor exists for
Picture, does the following code compile?DigitalPicture p = new Picture(); - Assuming that a no-argument constructor exists for Picture, does the following code compile?
SimplePicture p = new Picture(); - Assuming that a no-argument constructor exists for SimplePicture, does the following code compile?
Picture p = new SimplePicture();
DigitalPicture is an interface. An interface most often only has public abstract methods. An abstract method is not allowed to have a body. Notice that none of the methods declared in DigitalPicture have a body. If a method can't have a body, what good is it?
Interfaces are useful for separating what from how. An interface specifies what an object of that type needs to be able to do but not how it does it. You cannot create an object using an interface type. A class can implement (realize) an interface as SimplePicture does. A non-abstract class provides bodies for all the methods declared in the interface, either directly or through inheritance. You can declare a variable to be of an interface type and then set that variable to refer to an object of any class that implements that interface. For example, Java has a List interface that declares the methods that a list should have such as add, remove, and get, etc. But, if you want to create a List object you will create an ArrayList object. It is recommended that you declare a variable to be of type List, not ArrayList, as shown below (for a list of names).
List<String> nameList = new ArrayList<String>();
Why wouldn’t you just declare nameList to be of the type ArrayList<String>? There are other classes in Java that implement the List interface. By declaring nameList to be of the type List<String> instead of ArrayList<String>, it is easy to change your mind in the future and use another class that implements the same interface. Interfaces give you some flexibility and reduce the number of changes you might need to make in the future, as long as your code only uses the functionality defined by the interface.
Because DigitalPicture declares a getPixels2D method that returns a two-dimensional array of Pixel objects, SimplePicture implements that interface, and Picture inherits from SimplePicture, you can use the getPixels2D method on a Picture object. You can loop through all the Pixel objects in the two-dimensional array to modify the picture. You can get and set the red, green, and/or blue value for a Pixel object. You can also get and/or set the Color value for a Pixel object. You can create a new Color object using a constructor that takes the red, green, and blue values as integers as shown below.
Color myColor = new Color(255,30,120);
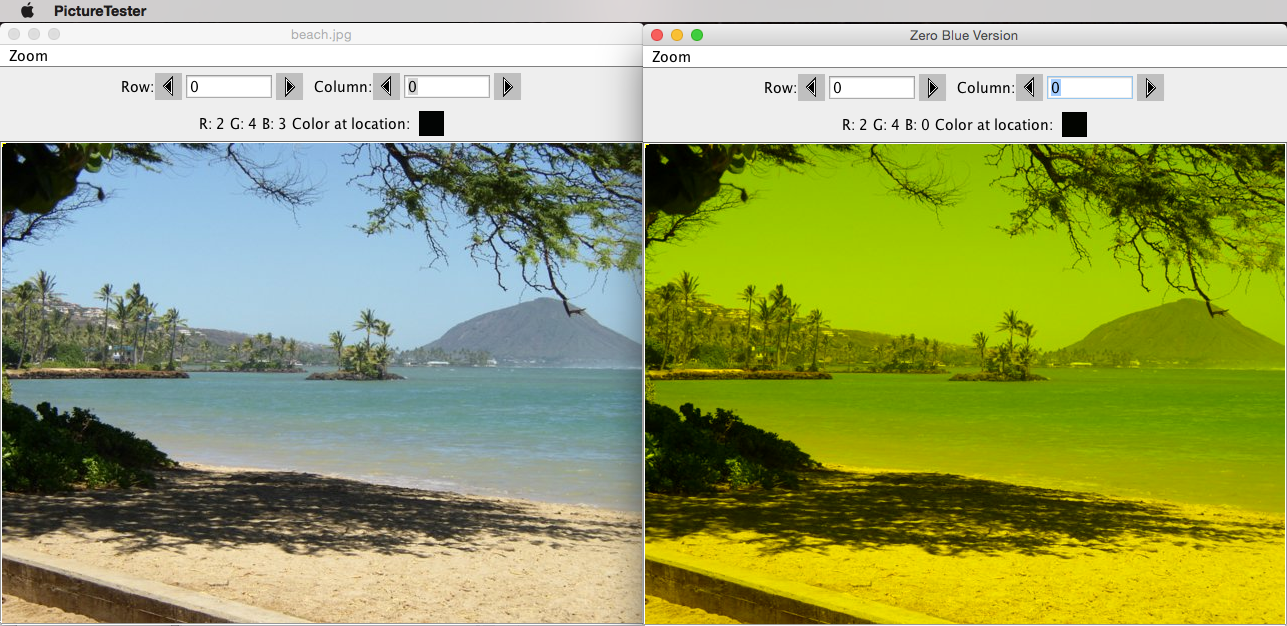
What do you think you will see if you modify the beach picture in the images folder to set all the blue values to zero? Do you think you will still see a beach? Run the main method in the Picture class. The body of the main method will create a Picture object named beach from the “beach.jpg” file, open an explorer on a copy of the picture (in memory), call the method that sets the blue values at all pixels to zero, and then open an explorer on a copy of the resulting picture.
The following code is the main method from the Picture class.
public static void main(String[] args)
{
       Picture beach = new Picture("beach.jpg");
       beach.explore();
       beach.zeroBlue();
       beach.explore();
}
Try Exercises 1 and 2 now if you like...
The method zeroBlue in the Picture class gets a two-dimensional array of Pixel objects from the current picture (the picture the method was called on). It then declares a variable that will refer to a Pixel object named pixelObj. It uses a nested for-each loop to loop through all the pixels in the picture. Inside the body of the nested for-each loop it sets the blue value for the current pixel to zero. Note that you cannot change the elements of an array when you use a for-each loop. If, however, the array elements are references to objects that have methods that allow changes, you can change the internal state of objects referenced in the array (pixels).
The following code is the zeroBlue method in the Picture class.
public void zeroBlue()
{
       Pixel[][] pixels = this.getPixels2D();
       for (Pixel[] rowArray : pixels)
       {
            for (Pixel pixelObj : rowArray)
            {
                pixelObj.setBlue(0);
            }
       }
}
The following code is the testZeroBlue method in the PictureTester class.
/** Method to test zeroBlue */
  public static void testZeroBlue()
  {
    Picture beach = new Picture("beach.jpg");
    beach.explore();
    beach.zeroBlue();
    beach.setTitle("Zero Blue Version");
    beach.explore();
  }
The tester will show two explorer windows, one before you remove the blue, and another after:
To modify pictures, you will be making methods in the Picture class and method testers in the PictureTester class.
Exercises
- Open
PictureTester.javaand run itsmainmethod. You should get the same results as running themainmethod in thePictureclass. ThePictureTesterclass contains class (static) methods for testing the methods that are in thePictureclass. - Uncomment the appropriate test method in the
mainmethod ofPictureTesterto test any of the other methods inPicture.java. You can comment out the tests you don’t want to run. You can also add new test methods toPictureTesterto test any methods you create in thePictureclass. - Using the
zeroBluemethod as a starting point, write the methodkeepOnlyBluethat will keep only the blue values, that is, it will set the red and green values to zero. Create a class (static) method to test this new method in the classPictureTester. Be sure to call the new test method in themainmethod inPictureTester. - Write the
negatemethod tonegateall the pixels in a picture. To negate a picture, set the red value to 255 minus the current red value, the green value to 255 minus the current green value and the blue value to 255 minus the current blue value. Create a class (static) method to test this new method in the classPictureTester. Be sure to call the new test method in themainmethod in PictureTester. - Write the
grayscalemethod to turn the picture into shades of gray. Set the red, green, and blue values to the average of the current red, green, and blue values (add all three values and divide by 3). Create a class (static) method to test this new method in the classPictureTester. Be sure to call the new test method in the main method inPictureTester. - Challenge (for 11 points) — Explore the “water.jpg” picture in the images folder. Write a method
fixUnderwater()to modify the pixel colors to make the fish easier to see. Create a class (static) method to test this new method in the classPictureTester. Be sure to call the new test method in the main method inPictureTester. Other extra credit ideas: Combine 2 pictures into one by alternating pixels between the two, see if you modify edge detection or make changes to pixels based upon their neighboring pixels... Invent your own mod!